


通过阅读此文,你可以快速了解如何使用飞书低代码平台的自定义函数。
限制说明
接口的数据量等相关限制,在相关接口的说明部分阐述
- 「函数节点执行」及「 函数被其他函数或函数节点调用」时的超时执行时间:5 min(字节租户 15 min)
- 函数被 DX Service API 或 Public API 调用的超时执行时间:60 s
- 请求函数的单次请求 body 大小限制:30 M
- 云函数代码量限制:5 M
- 云函数执行内存限制:256 M(字节租户 1024 M)
SDK 版本及更新历史
SDK 功能地图
SDK 详细说明
【Logger 关键字下的属性和方法】
日志记录器
【Context 关键字下的属性和方法】
用于获取上下文信息,如当前租户信息、当前 Workflow 实例信息等
context.tenant 获取租户信息
{
"id": 123,
"name": "hotpot",
"type": 1, //1-PROD,3-DEVORG,4-SANDBOX
"namespace": "namespaceValue"
}
context.user.initiator 获取触发 workflow 的用户信息
{
"_department": null,
"_email": "test@bytedance.com",
"_id": 1661915892174855,
"_isDeleted": false,
"_manager": null,
"_name": [
{
"language_code": 1033,
"text": "John Smith"
},
{
"language_code": 2052,
"text": "王大锤"
}
],
"_objectId": 1636239217955847,
"_phoneNumber": null,
"_type": null,
"_active": true,
"_createdAt": 1584926561970,
"_createdBy": {
"i18n_name": [
{
"language_code": 1033,
"text": "Tom"
},
{
"language_code": 2052,
"text": "王大锤"
}
],
"id": 1638728720535579,
"is_deleted": false,
"name": "王大锤"
},
"_updatedAt": 1603602044224,
"_updatedBy": {
"i18n_name": [
{
"language_code": 1033,
"text": "A Qiu"
},
{
"language_code": 2052,
"text": "王大锤"
}
],
"id": 1671002424540206,
"is_deleted": false,
"name": "王大锤"
}
}
context.targetRecord / context.trigger 获取当前记录信息 (deprecated,请勿使用)
.targetRecord
- 「基于记录」类型的 Action 传入的目标记录信息(如在 王一一 这条记录上点击办理离职,王一一这条记录就是 target record)
- 当前记录包括:
- context.targetRecord.original
- workflow 被触发时,原始的 record 信息。比如在 王一一 这条记录上点击办理离职,context.targetRecord.original 就是 王一一 这条记录(假如最后工作日期为 2020-12-01)。流程触发时,original 和 proposed 值相同。
- context.targetRecord.proposed
- 假如上述工作流中存在审批节点,用户在审批时将王一一的「最后工作日期」修改为了 2021-01-01。这时 original.最后工作日期为 2020-12-01, proposed.最后工作日期为 2021-01-01。
- 结构示例
{
"_createdAt": 1602727082783,
"_createdBy": {},
"_domain": "Custom",
"_id": 1680580735212606,
"_isDeleted": false,
"_name": "【飞书人事】支持 HR 在小程序中使用待办",
"_objectId": 1636460982075419,
"_updatedAt": 1603691803405,
"_updatedBy": {},
"customFieldApiName1": "field1_value",
"customFieldApiName2": "field2_value"
}
.trigger
- Automation 类型的 Workflow 传入的目标记录信息(如设置为当用户记录发生变化时触发工作流,那么在 王一一 这条记录发生变更时,王一一这条记录就是当前记录)
- 当前记录包括:
- context.trigger.old
- Automation workflow 被触发时,原始的 record 信息。
- context.trigger.new
- Automation workflow 被触发时,record 被修改后的记录。
- 结构示例
{
"context": {
"trigger": {
"new": {
"_id": 1685033546722350,
"_isDeleted": false,
"_objectId": 1685033977294878,
"_name": "SampleText",
"moon__field1": "SampleText",
"moon__multiFile": [
{
"id": "e8ed12345378950437584230750434717",
"mime_type": "png",
"name": "file_name1.png",
"size": 1050620,
"token": "33edea2a3123123jkgfdsjjkl2342343"
},
{
"id": "e8ed12345378950437584230750434734",
"mime_type": "png",
"name": "file_name2.png",
"size": 1050620,
"token": "33edea2a3123123jkgfdsjjkl2896734"
}
],
"_createdBy": {
"id": 1234567890123,
"is_deleted": false,
"name": "Sample Text"
},
"_createdAt": 1609430400000,
"_updatedBy": {
"id": 1234567890123,
"is_deleted": false,
"name": "Sample Text"
},
"_updatedAt": 1609430400000,
"_domain": "SampleText"
},
"old": {}
}
}
}
context.workflow 工作流操作
.instanceId 在函数中获取工作流实例的 ID
context.workflow.instanceId
// 工作流实例 ID 可用于终止进行中的工作流实例(详情参考 context.workflow.terminate 方法)
.variables 在函数中获取工作流变量
- 在函数中通过 context.workflow.variables.variablesApiname或context.workflow.variables['variablesApiname'] 获取变量信息
// 获取 workflow 变量 company
context.workflow.variables.company;
context.workflow.variables['company']
- 示例一:
- (注意:原 context.workflow.variables._initialRecord 已下线,请勿使用!)
// 获取 workflow 变量 (比如触发后的记录数据:_initialRecord__proposed___user)
const record = context.workflow.variables._initialRecord__proposed___user;
// 举例中 _initialRecord__proposed___user 是 User 上的记录,则 record 结构如下
{
"_accountStatus": "_used",
"_active": true,
"_createdAt": 1594267362744,
"_domain": "Custom",
"_email": "test@bytedance.com",
"_enableAccountPassword": true,
"_id": 1671710269480973,
"_isDeleted": false,
"_objectId": 1668712749157416,
"_updatedAt": 1606744749161,
"_createdBy": {
"id": 1668712748711998,
"is_deleted": false,
"name": ""
},
"_phoneNumber": {
"code": "+86",
"key": "+86(CN)",
"number": "13129931000"
},
"_updatedBy": {
"id": 1668712748711998,
"is_deleted": false,
"name": ""
},
"_name": [
{
"language_code": 2052,
"text": "李一一"
}
],
"_avatar": {
"color": "#4871e9",
"color_id": "G",
"image": null,
"source": "field",
"content": [
{
"language_code": 2052,
"text": "李一一"
}
]
}
}
// 获取 _active 字段的值
const active = context.workflow.variables._initialRecord__proposed___user._active;
示例二:
// 假如 workflow 中有一个文本类型变量 textVar,值为 '123'
const t = context.workflow.variables.textVar;
// 则 t 的值为 '123'
- 示例三:
// 假如 workflow 中有一个多语文本类型变量 mulVar,中文为:中国;英文为:China
const t = context.workflow.variables.mulVar;
// 则 t 的值为
[
{
"language_code": 1033,
"text": "China"
},
{
"language_code": 2052,
"text": "中国"
},
]
.updateVariable() 在函数中更新工作流变量的值
表单变量不支持更新
- 方式一:使用 .updateVariable ()方法
await context.workflow.updateVariable('workflowVariableApiName', value)
await context.workflow.updateVariable({
'_initialRecord__proposed___user': { '_email': 'test@bytedance.com'},
'textVar': '文本',
'workflowVariableApiName': value
})
- 方式二:通过 return 返回对应变量的值
return { 'workflowVariableApiName': value}
return {
'_initialRecord__proposed___user': {'_email': 'test@bytedance.com'},
'textVar': '文本',
'workflowVariableApiName': value
}
数据结构说明
基本类型
文本 Text
- 示例:
- 为 Workflow 文本变量 var_name 设置值为例,可通过以下写法实现:
- 方式一
return {
"var_name": "我的祖国"
}
- 方式二
context.workflow.updateVariable("var_name", "我的祖国")
数字 Number
- 示例:
- 为 Workflow 数字变量 var_name 设置值为例,可通过以下写法实现:
- 方式一
return {
"var_name": 123
}
- 方式二
context.workflow.updateVariable("var_name", 123)
布尔 Boolean
- 示例:
- 为 Workflow 布尔变量 var_name 设置值为例,可通过以下写法实现:
- 方式一
return {
"var_name": true
}
- 方式二
context.workflow.updateVariable('var_name', true)
邮箱 Email
- 示例:
- 为 Workflow 邮箱变量 var_name 设置值为例,可通过以下写法实现:
- 方式一
return {
"var_name":'test@bytedance.com'
}
- 方式二
context.workflow.updateVariable('var_name', "test@bytedance.com")
选项 Option
- 示例:
- 为 Workflow 记录变量 _initialRecord(User) 设置字段员工类型(employeeType, 选项类型)的值为例,可通过以下写法实现:
- 方式一
return {
"_initialRecord": {'employeeType': 'option_value_api_name'}
}
- 方式二
context.workflow.updateVariable('_initialRecord', {
'employeeType': 'option_value_api_name'
})
复杂类型
多语文本 Multilingual
- 规范:
new kunlun.type.Multilingual({
"zh": '你好',
"en": 'hello',
"ja": 'こんにちは',
"fr": 'Bonjour'
})
- 示例:
- 设置多语文案
- 方式一
// 通过返回值更新 Multilingual 类型变量
return {
"var_name": new kunlun.type.Multilingual({
"zh": '你好',
"en": 'english'
})}
- 方式二
// 通过显式方法更新变量
context.workflow.updateVariable("var_name", new kunlun.type.Multilingual({
"zh": '我的祖国',
"en": 'My Homeland'
}))
•只设置单一语种
// 只设置单一语种
return {
"var_name": new kunlun.type.Multilingual({
"en": 'My Homeland'
})
}
日期 Date
- 规范:
- 通过文本日期赋值
@param stringDate 文本格式日期,如 2020-01-01
Date(stringDate)
- 指定年月日赋值
@param year 年份
@param month 月份 1-12
@param day 日期 1-31
Date(year, month, day)
- 入参为空,返回当前日期
- 示例:
- 为 Workflow 日期变量 var_name 设置 2020-01-01 为例,可通过以下写法实现:
- 方式一
return {
"var_name": new kunlun.type.Date("2020-01-01")
}
- 方式二
return {
"var_name": new kunlun.type.Date(2020, 1, 1)
- 方式三
return {
"var_name": "2020-01-01"
}
- 方式四
context.workflow.updateVariable('var_name', new kunlun.type.Date(2020,1,1))
- 方式五
context.workflow.updateVariable('var_name', "2020-01-01")
日期时间 DateTime
- 规范:
- 通过文本日期和时区赋值
// 默认东八区
// 如果 string_date 已经包含时区,则忽略第二个参数
@param stringDate 文本格式日期,如 2020-01-01 20:00:00
@param GMTOffset GMT 偏移量,默认为 GMT+8(东八区)
DateTime(stringDate, GMTOffset=kunlun.GMTOffset.GMT8)
•通过时间戳赋值
@param unixNumberDate 时间戳格式,如 1577836800000
DateTime(unixNumberDate)
// UNIX 时间戳
// Seconds since Jan 01 1970. (UTC)
•通过指定年月日时分秒和时区赋值
// 默认东八区
@param year 年份
@param month 月份 1-12
@param day 日期 1-31
@param hour 小时 0-23
@param min 分钟 0-59
@param sec 秒 0-59
@param GMTOffset GMT 偏移量,默认为 GMT+8 (东八区)
DateTime(year, month, day, hour, min, sec, GMTOffset =kunlun.GMTOffset.GMT8)
•kunlun.GMTOffset 枚举库
◦GMT+0 ~ GMT+14; GMT-1 ~ GMT-12
kunlun.GMTOffset = {
"GMT00": 'GMT+00',
"GMT01": 'GMT+01',
"GMT02": 'GMT+02',
...
"GMT14": 'GMT+14',
"GMT_01": 'GMT-01',
"GMT_02": 'GMT-02',
...
"GMT_12": 'GMY-12'
}
- 入参为空,返回当前日期时间
- 示例:
- 为 Workflow 日期时间变量 var_name 设置 2020-01-01(东八区) 为例,可通过以下写法实现:
- 方式一
return {
"var_name": new kunlun.type.DateTime(2020, 1, 1, 0, 0, 0)
}
- 方式二
return {
"var_name": new kunlun.type.DateTime("2020-01-01 00:00:00 GMT+08")
}
- 方式三
context.workflow.updateVariable('var_name', new kunlun.type.DateTime(2020,1,1,0,0,0))
- 方式四
context.workflow.updateVariable('var_name', new kunlun.type.DateTime(2019,12,31,23,0,0, kunlun.GMTOffset.GMT7))
电话 Phone
- 规范:
@param phoneNumber 电话号码
@param countryCode 默认为 +86
Phone(phoneNumber, countryCode="+86")
•kunlun.countryCode 常量库,更多信息参考 Country Code
kunlun.countryCode = {
"CN": "+86",
"US": "+1",
...
}
- 示例:
- 设置 + 86 手机号 13800000000
- 方式一
return {
"var_name": new kunlun.type.Phone('13800000000')
}
- 方式二
context.workflow.updateVariable('var_name', new kunlun.type.Phone("13800000000"))
- 方式三
// 以英文空格区分 国家代码 和 电话号码
return {
"var_name": "+86 13800000000"
}
- 设置 +1 手机号 987654321
- 方式一
return {
"var_name": new kunlun.type.Phone('987654321', '+1')
}
- 方式二
context.workflow.updateVariable('var_name', new kunlun.type.Phone("987654321", "+1"))
- 方式三
// 以英文空格区分 国家代码 和 电话号码
return {
"var_name": "+86 13800000000"
}
.terminate() 终止工作流审批流程
- 语法
context.workflow.terminate(workflowInstanceId, options?)
workflowInstanceId: 工作流实例 ID,可通过 context.workflow.instanceId 获取
options?: 高级配置参数,可选,包括:
- reason: 终止原因,仅在流程中包括审批流程时适用,此内容将作为撤回审批的原因进行展示
- 示例
await context.workflow.terminate(123456, {reason: new kunlun.type.Multilingual({zh: "取消", en: "cancel"})});
context.db 数据操作接口
- 函数节点提供了一套简单易用的数据操作功能,在自定义函数中,无需安装和引用,只需通过 context.db.* 即可进行操作
- 平台层面对数据操作的数据量大小限制为 50 M
- 单次数据库请求耗时大概 300ms,批量数据处理 建议 使用批量接口
.create() 创建数据
- 语法:
await context.db.object(objectApiName).create(record)
await context.db.currentObject().create(recordObj)
- 示例 1:
// 在 User 对象中创建一条记录
const record = await context.db.object("_user").create({
"_name": new kunlun.type.Multilingual({"zh": "中文名称", "en": "English Name"}),
"_phoneNumber": new kunlun.type.Phone("18610595108"),
"_email": "test@bytedance.com"
})
- 示例 2:
// 在 Department 对象中创建一条记录
// 演示 lookup 字段怎么赋值
const record = await context.db.object("_department").create({
"_name": new kunlun.type.Multilingual({ zh: "部门" }),
"_manager": { _id: 16601111111111111 },
"_status": "_active"
})
// 如果 lookup 需要赋值为空, 需要设置为 null
const record = await context.db.object("_department").create({
"_name": new kunlun.type.Multilingual({ zh: "部门" }),
"_manager": null,
"_status": "_active"
})
.update() 更新数据
- 语法:
// 方式一
await context.db.object(objectApiName).update(recordId, recordMap)
// 方式二
await context.db.object(objectApiName).update(recordMap)
- 示例:
// 更新 User 的「Email」字段
// update 类型 action 可通过 context.targetRecord 获取当前记录
const user = context.targetRecord.original;
await context.db.object("_user").update(user._id, {"_email": "test@bytedance.com"})
// Lookup 字段的更新方式
// 更新指定部门的上级部门
const dept = context.targetRecord.original;
await context.db.object("_department").update({
_id: dept._id,
_superior: { _id: 1684406378478604 } // 可通过赋值为 null 将 lookup 字段更新为空值
})
.delete() 删除数据
- 语法:
await context.db.object(objectApiName).delete(record)
await context.db.object(objectApiName).delete(recordId)
- 示例:
// 删除当前记录
await context.db.object("_user").delete(context.targetRecord.original);
// 删除 User 中的数据
await context.db.object('_user').delete(166012345678)
.batchCreate() / .batchUpdate() / . batchDelete() Record 同步批量操作接口
数据量限制为 500 条 (4.11.x 版本及以后)
- 示例
// 批量创建记录
await context.db.object("_user").batchCreate(
[
{"_name": "John", "age": 19, "gender": "male"},
{"_name":" "Alis", "age": 16, "gender": "female"}
]
);
// 批量更新记录
await context.db.object("_user").batchUpdate(
[
{"_id": 1660000000, "_name": "John", age: 19, "gender": "male"},
{"_id": 1660000001, "_name": "Alis", age: 16, "gender": "female"}
]
);
// 批量删除记录
await context.db.object("_user").batchDelete([1660000000, 1660000001]);
.batchCreateAsync() / .batchUpdateAsync() / . batchDeleteAsync() Record 异步批量操作接口
数据量限制为 1000 条
- 示例
// 批量创建记录
await context.db.object("_user").batchCreateAsync(
[
{"_name": "John", "age": 19, "gender": "male"},
{"_name": "Alis", "age": 16, "gender": "female"}
]
);
// 批量更新记录
await context.db.object("_user").batchUpdateAsync(
[
{"_id": 1660000000, "_name": "John", "age": 19, "gender": "male"},
{"_id": 1660000001, "_name": "Alis", "age": 16, "gender": "female"}
]
);
// 批量删除记录
await context.db.object("_user").batchDeleteAsync([1660000000, 1660000001]);
.where().find() / findOne() / findAll() 查询数据
- 语法:
//根据条件查询record列表
context.db.object(objectApiName)
.where(condition)
.select(fieldApiNamel,
fieldApiName2...fieldApiNameN)
.orderBy(fieldApiNamel,
fieldApiName2...fieldApiNameN)
.orderByDesc(fieldApiNamel,
fieldApiName2...fieldApiNameN)
.limit(size)
//每页返回的最大记录数,有效值范围1-
200,v2.1版本起支持
.offset(num)//编移量,v2.1版本起支持。当 Offset 较大时,容易产生慢查询,效率较低
.find()//返回符合条件的结果,类型为数组【{}】
// 返回排在第一位的 record
findOne()
findAll()//返回符合查询条件的所有记录(慎用!!!)
count()//查询记录总数,v3.3.6版本起支持。用法
.where(filter).count()
- 备注1:findAll 接口会在底层基于ID游标自动做好所有分页加载,合并所有数据后返回,当数量过大时容易出现「超过最大内存限制制」错误,务必慎用!!!
- 备注2:findAll 接口不支持设置 Offset/Limit/OrderBy/OrderByDesc等参数。
- 过滤器:
- where(condition)
- 只返回满足条件的记录
- 4.6 版本以上的包支持设置两层字段查询条件(即可使用对象下的字段,以及对象的「关联对象字段」下的子字段设置查询条件),4.6 版本以下的包支持一层(仅可使用对象下的字段设置查询条件)
- condition 的格式为 {fieldApiName: value, ...},其中 value 支持通过 kunlun.operator.* 下的方法进行操作符运算
// 使用对象下的字段设置查询条件
// 查询 User 对象上 email 为 test@bytedance.com 的用户
const users = await context.db.object('_user').where({
'_email': 'test@bytedance.com'
}).find();
// 查找上级部门为指定部门的部门列表
const records = await context.db.object('_department').where({
'_superior': 1684406378478604 // where 中对 lookup 字段同时支持用 {_id: 123123123} 和 123123123 的格式设置查询条件
}).find();
logger.info(records);
// 使用对象的「关联对象字段」下的子字段设置查询条件
// 查询「上级」所在部门为「部门 A」的全部员工
const users = await context.db.object('_user').where({
'_superior': { '_department': 123123123123}, // 假设 123123123123 为「部门 A 的记录 ID
}).find();
- select
- 只返回需要的字段
- 排序:
- orderBy
// 按照 _email 进行排序
.orderBy('_email')
// 先按照 _email 再按照 _phoneNumber 进行排序
.orderBy('_email', '_phoneNumber')
•orderByDesc
// 按照 _email 进行倒序排序
.orderByDesc('_email')
// 先按照 _email 再按照 _phoneNumber 进行倒序排序
.orderByDesc('_email', '_name')
- 过滤返回字段:
- .select
// 只返回 _email 字段
.select('_email')
// 只返回 _email 和 _name 字段
// 支持如下可变参数和数组两种写法
.select('_email', '_name')
.select(['_email', '_name'])
- 限制:
- 只能查询单个对象符合条件的 record 或 record list
- 单次查询最多返回 200 条记录
- 示例:
.newTransaction 数据库事务
事务作为单个逻辑工作单元执行的一系列操作,可以保证多个数据库写入操作的原子性
目前事务中的总注册量限制为 50 条;总批量操作(含创建、更新、删除)的数据量限制 500;
- 语法
// 创建一个新的空事务
let tx = context.db.newTransaction();
// 注册创建
tx.registerCreate(param): PreCreateResult {}
// 注册更新
tx.registerUpdate(param): void {}
// 注册删除
tx.registerDelete(param): void {}
// 提交事务
tx.commit(): void {}
- 示例
// 开启事务
let tx = context.db.newTransaction();
// 注册创建
let employee = tx.object("employee").registerCreate({
"_name": new kunlun.type.Multilingual({zh: "张三", en: "zhangsan"})
});
// 注册含 lookup 字段的创建
let contract = tx.object("contract").registerCreate({
"_name": "张三的合同",
"employee": {"_id": employee._id},
});
// 提交事务
await tx.commit();
// 打印返回值(事务提交前,返回值中的 _id 均为临时 _id,只有提交事务后,才是 DB 中的真实 _id)
logger.info("employeeId: ", employee._id);
logger.info("contractId: ", contract._id);
context.function 调用全局函数
- 示例:
const res = await context.function('func_api_name').invoke({ a: 1 });
context.resources 上传及下载文件
【注意】 下载文件时,通过工作流变量(如 context.workflow.variables.{varApiName} 或 context.targetRecord 或 context.trigger)获取到的 token 具有权限限制,因此无法直接用于下载文件,正确的路径为:
- 通过工作流变量拿到记录的 id
- 用拿到的 id 通过 context.db.currentObject().where({_id: ..}).findOne() 查询记录,并根据指定字段获取 token
- 使用 db 查询获得的 token 下载文件
- 语法:
// 上传本地文件,如 /tmp/12345.jpg
const file_info = await context.resources.file.upload(file_path);
// 以文件流的形式来上传,比如上传一个网络文件
const file_info = await context.resources.file.upload(file_stream);
// 下载文件,获取文件的 buffer
await context.resources.file.download(file_info);
// 下载文件,将文件存储在 file_path 中
await context.resources.file.download(file_info, file_path);
- 示例:
- 上传文件
const axios = require('axios');
// 获取网络文件流
const resp = await axios({
url: 'http://www.juimg.com/tuku/yulantu/140112/328648-14011213253758.jpg',
method: 'get',
responseType: 'stream'
});
// 上传文件获取文件 token
const file_info = await context.resources.file.upload(resp.data);
console.log(file_info);
/*
返回示例
{
id: 'a4879a6d2e8e43b98781ba6f5b261071',
mime_type: 'jpg',
name: '328648-14011213253758.jpg',
size: 143592,
token: '57b70c0acf244e62887a2dcf9bf938c1'
}
*/
const record = await context.db.currentObject().create({
"_name": `${new Date().getTime()}`,
"moon__singleFile": [{ ...file_info }] // 文件类型字段赋值
});
console.log(record);
const file = '/tmp/123456.jpg';
// 上传文件获取文件 token
const file_info = await context.resources.file.upload(file);
console.log(file_info);
/*
返回示例
{
id: 'a4879a6d2e8e43b98781ba6f5b261071',
mime_type: 'jpg',
name: '328648-14011213253758.jpg',
size: 143592,
token: '57b70c0acf244e62887a2dcf9bf938c1'
}
*/
const record = await context.db.currentObject().create({
"_name": `${new Date().getTime()}`,
"moon__singleFile": [{ ...file_info }] // 文件类型字段赋值
});
console.log(record);
- 下载文件
// 方式一,通过 file_info 下载文件(推荐使用)
const file_info = {
id: 'a4879a6d2e8e43b98781ba6f5b261071', // 必填
mime_type: 'jpg',
name: '328648-14011213253758.jpg',
size: 143592,
token: '57b70c0acf244e62887a2dcf9bf938c1'
}
const file_path = "/tmp/test.jpg"
// 下载文件,获取文件的 buffer
const file1 = await context.resources.file.download(file_info);
//下载文件,将文件存在指定 file_path 中
await context.resources.file.download(file_info, file_path);
// 方式二,使用 file token 下载文件;只能下载从记录中获取的 或 通过 file.upload 上传的文件
const file_token = file_info.token
// 下载文件,获取文件的 buffer
const file2 = await context.resources.file.download(file_token);
//下载文件,将文件存在指定 file_path 中
await context.resources.file.download(file_token, file_path);
context.tasks 任务创建接口
.createAsyncTask() 创建异步任务
调试时为获取异步任务的执行日志,仍为同步执行
- 示例
// globalFunc 为全局函数,params 为全局函数的入参
// 被调用的全局函数将以异步的方式执行
await context.tasks.createAsyncTask("globalFunc", params);
.createDistributedTask() 创建分布式任务
- 创建一个分布式任务,通常需要结合 3 个全局函数完成。示例:
// 编写主要业务逻辑的函数
// 开发者可以在函数节点或全局函数中创建分布式任务用以处理复杂&耗时的后台异步任务
module.exports = async function (params, context, logger) {
// 解析 excel 拿到待处理数据集
const dataset = [{}];
// 创建分布式任务,获取任务 ID
const taskId = await context.tasks.createDistributedTask(
dataset, // 待处理数据组成的数组
"handlerFunc", // 用于处理数据集的全局函数的 API name
"progressCallbackFunc", // 任务进度发生变化时回调的全局函数的 API name,可通过传入"" / null / undefined 跳过此步骤
"completedCallbackFunc", // 任务完成时回调的全局函数的 API name,可通过传入"" / null / undefined 跳过此步骤
{ // 以下为可选参数:
concurrency: 5, // 并发数量,默认值为 5,最大可设置值为 10,若实际设置值超过可设置最大值,将报错
maxSliceNumber: 20, // 单个子任务的最大数据量,默认值为 5,最大可设置值为 100,若实际设置值超过可设置最大值,将报错
progressCallbackStep: 30 // 触发进度回调函数的步长,每当发生大于等于步长的进度变化时,便触发进度回调函数
});
...(其他业务逻辑)
}
// 分布式任务对 data 进行处理的核心业务逻辑
// 由全局函数承载,假设 API name = "handlerFunc"
// 全局函数的执行由分布式任务引擎调度触发,触发时注入任务上下文
module.exports = async function (params, context, logger) {
// 当前子任务上下文
const taskId = params.taskId;
const taskData = params.data; // data 为数组结构,是 dataset 被分布式引擎切分后的结果
// do something
// 编写数据处理逻辑
// 比如校验数据,存储错误信息,数据入库
}
// 进度监听回调函数
// 由全局函数承载,假设 API name = "progressCallbackFunc"
// 分布式任务整体进度变化时回调该函数
module.exports = async function (params, context, logger) {
// 当前子任务上下文
const taskId = params.taskId;
const percent = params.percent; // 当前分布式任务的总体进度
// do something
// 编写任务进度变化时的处理逻辑
// 比如根据当前进度更新消息中心进度
}
// 任务完成回调函数
// 由全局函数承载,假设 API name = "taskCompletedCallbackFunc"
// 分布式任务完成时回调该函数
module.exports = async function (params, context, logger) {
// 当前子任务上下文
const taskId = params.taskId;
// do something
// 编写任务完成后的处理逻辑
// 比如汇总处理结果,并导出为 excel
}
context.msg 向消息中心推送消息
FaaS SDK 中新增向消息中心推送消息能力
- 创建消息await context.msg.notifyCenter.create(msg)
- 更新消息await context.msg.notifyCenter.update(msgId, msg)
- msg 定义
{
// icon 类型
// 有效值:进度消息-progress;通知消息-info;错误消息-error;成功消息-success
icon: 'progress',
// 接受消息的用户 ID 列表
target_users: [user._id],
// 消息标题
title: new kunlun.type.Multilingual({
zh: '测试消息',
en: 'english title'
}),
// 消息内容
detail: new kunlun.type.Multilingual({
zh: '测试消息内容',
en: 'english content'
}),
// 进度消息的进度值,有效值范围 0-100
percent: 5
}
- 示例:
module.exports = async function (params, context, logger) {
// 日志功能
logger.info(`${new Date()} 函数开始执行`);
const user = await context.db.object('_user').where({
_email: 'wangzhong.1@bytedance.com'
}).findOne();
const msgId = await context.msg.notifyCenter.create({
icon: 'progress',
target_users: [user._id],
title: new kunlun.type.Multilingual({
zh: '测试消息'
}),
detail: new kunlun.type.Multilingual({
zh: '测试消息内容'
}),
percent: 5
});
console.log(msgId);
let percent = 10;
while (true) {
await sleep(100);
if (percent >= 100) {
await context.msg.notifyCenter.update(msgId, {
icon: 'success',
title: new kunlun.type.Multilingual({
zh: '成功消息标题'
}),
detail: new kunlun.type.Multilingual({
zh: '成功消息内容'
})
});
break;
}
await context.msg.notifyCenter.update(msgId, {
icon: 'progress',
percent: percent++
})
}
}
async function sleep(ms) {
return new Promise(resolve => setTimeout(resolve, ms));
}
context.headers / context.method 获取请求信息
.headers 获取请求 header
- object类型,通过 context.headers[key] 可以获取到对应 key 的请求头,key 对大小写不敏感,使用时统一为小写
.method 获取请求方法
- string 类型,可能的值有 POST、GET、PUT、PATCH 、DELETE
context.setResponseHeader 设置返回头
- 可通过以下两种方式设置返回头
// 方式一
await context.setResponseHeader("a", 1);
await context.setResponseHeader("b", 2);
// 方式二
await context.setResponseHeader({a:1, b:2});
【Kunlun 关键字下的属性和方法】
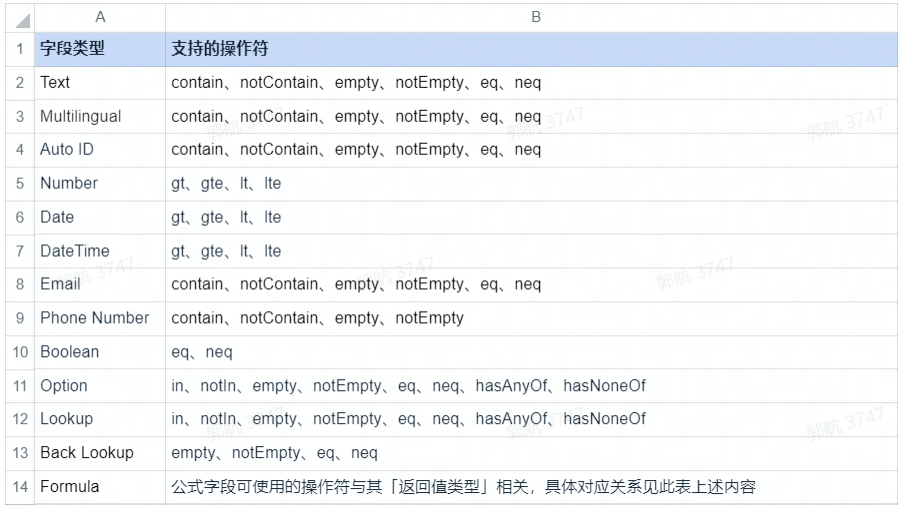
kunlun.operator 指令操作符
操作符 | 说明 | 支持的字段类型 | 示例 |
kunlun.operator.and | 逻辑且 | -- | |
kunlun.operator.or | 逻辑或 | -- | |
kunlun.operator.contain | 包含 | Text、Multilingual、Auto ID、Email、Phone Number | |
kunlun.operator.notContain | 不包含 | Text、Multilingual、Auto ID、Email、Phone Number | |
kunlun.operator.in | 包含于 | Text、Number、Option、Lookup | |
kunlun.operator.notIn | 不属于任意一个 不含任一 | Option、Lookup | |
kunlun.operator.empty | 为空 | Text、Multilingual、Auto ID、Number、Date、DateTime、Email、Phone Number、Option、Lookup、Back Lookup | |
kunlun.operator.notEmpty | 不为空 | Text、Multilingual、Auto ID、Number、Date、DateTime、Email、Phone Number、Option、Lookup、Back Lookup | |
kunlun.operator.eq | 等于 | Text、Multilingual、Auto ID、Number、Boolean、Date、DateTime、Email、Option、Lookup、Back Lookup | |
kunlun.operator.neq | 不等于 | Text、Multilingual、Auto ID、Number、Boolean、Date、DateTime、Email、Option、Lookup、Back Lookup | |
kunlun.operator.gt | 大于 晚于 | Number、Date、DateTime | |
kunlun.operator.gte | 大于等于 晚于等于 | Number、Date、DateTime | |
kunlun.operator.lt | 小于 早于 | Number、Date、DateTime | |
kunlun.operator.lte | 小于等于 早于等于 | Number、Date、DateTime | |
kunlun.operator.hasAnyOf | 存在给定的多个值中的任何一个值 | option(多值)、lookup(多值)、 lookup(hierarchy) | |
kunlun.operator.hasAllOf 4.7.x 以后版本不再支持此方法,可以使用 hasAnyOf() 的方法进行查询 | 包含全部给定的多个值 | option(多值)、lookup(多值)、 lookup(hierarchy) | |
kunlun.operator.hasNoneOf | 不存在给定的多个值中的任何值 | option(多值)、lookup(多值)、 lookup(hierarchy) | |
- 支持 filter 操作符的字段及其支持的操作符
250px|700px|reset
kunlun.redis 调用 Redis
- 限制:kunlun.redis.set(key, value) 中 value 的上限为 10KB,超出将报错
- 示例:
module.exports = async function(params, context, callback) {
// 赋值命令:SET key value
await kunlun.redis.set('foo', 'bar');
// 取值命令:GET key
const fooValue = await kunlun.redis.get('foo'); // bar
return { 'foo': fooValue };
}
注意:如果存储的值为对象,需使用 JSON.stringify 转换为字符串存储,并在读取的时候进行 JSON.parse。例如:
await kunlun.redis.set('foo', JSON.stringify({a: 1}));
const result = JSON.parse(await kunlun.redis.get('foo'));
- 指令集:
- 完整的命令文档可以参考 Redis 命令文档。但函数节点中的 Redis 仅支持部分命令,请参考 Redis 服务支持的命令列表。
- 数据大小的上限
- string value 的大小 < 10KB
- hash/set/zset/list 等数据结构中,元素个数 < 5000 个
- hash/set/zset/list 等单 key 的整体 value < 10MB
kunlun.mongodb 使用 mongodb(nosql 数据库)
- 说明:提供一套基于 mongodb 的简单易用数据库功能,在云函数中,只需通过 kunlun.mongodb 即可进行操作,例如:
- 使用 const myTable = kunlun.mongodb.table('myTableName') 获取表;
- 使用 const items = await myTable.where().find() 查询所有记录;
- 使用 await myTable.save(items) 创建或更新记录;
- 使用 await myTable.delete(items) 删除记录。
- 创建表限制
- 表名需要由「数字」、「字母」、「下划线」组成且不能以「下划线」开头
- 表数上限为 100 个
使用入门
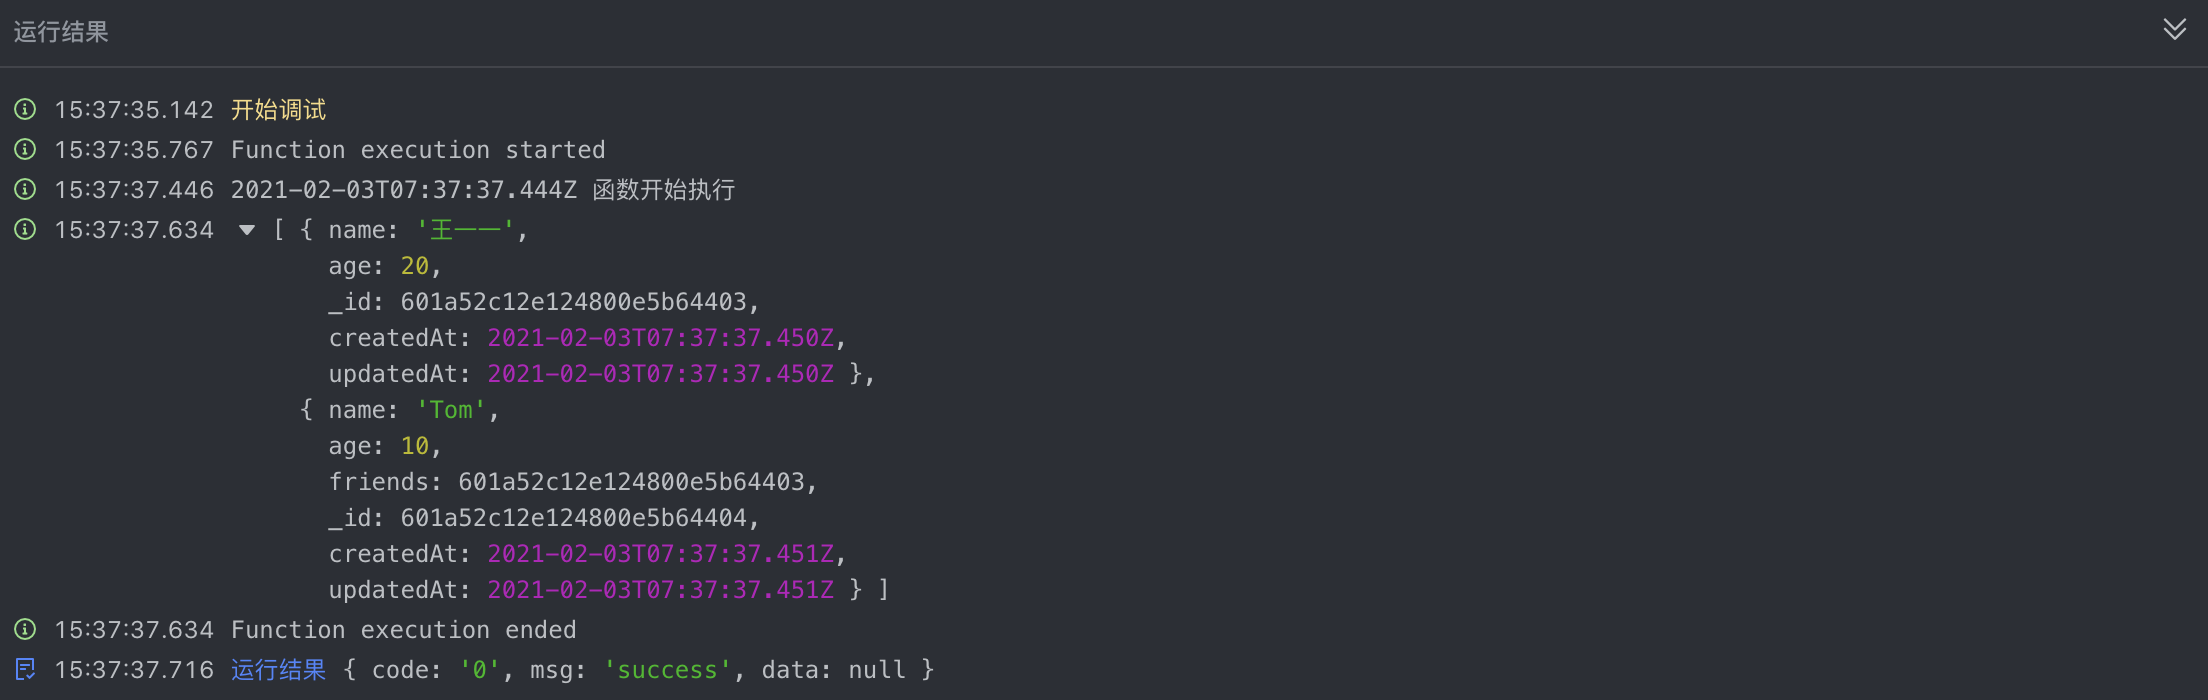
- 使用 save 插入记录
- 插入单条记录
const T = kunlun.mongodb.table('my_test_table');
const record = await T.save({
time: new Date().getTime(),
name: '王一一',
age: 20,
params: {
a: 1
}
});
console.log(record);

250px|700px|reset
- 插入多条记录
const T = kunlun.mongodb.table('my_test_table');
const records = await T.save([{
time: new Date().getTime(),
name: '王一一',
age: 20,
}, {
time: new Date().getTime(),
name: '王一一',
age: 20,
}]);
console.log(records);

250px|700px|reset
- 插入相互关联的数据
250px|700px|reset
- 使用 find 查询多条记录
const T = kunlun.mongodb.table('my_test_table');
const records = await T.where({
name: '王一一'
}).find();
console.log(records);
注:最多只返回 1000 条记录,若需要返回全部记录,可参考如下代码:
const T = kunlun.mongodb.table('my_test_table');
const count = await T.where().count();
const pros = [];
for (let i = 0; i < count; i += 1000){
const p = T.where().skip(i).limit(1000).find();
pros.push(p);
}
const pros_result = await Promise.all(pros);
const result = [].concat(...pros_result);
console.log(result.length);
- 使用 findOne 查询一条记录
const T = kunlun.mongodb.table('my_test_table');
const record = await T.where({
name: '王一一'
}).findOne();
console.log(record);
/*
{
"time": 1612335875097,
"name": "王一一",
"age": 20,
"params": { "a": 1 },
"_id": "601a4b035d0b2a0078eb4b45",
"createdAt": "2021-02-03T07:04:35.099Z",
"updatedAt": "2021-02-03T07:04:35.099Z"
}
*/
•修改记录并保存
const T = kunlun.mongodb.table('my_test_table');
const record = await T.where({
name: '王一一'
}).findOne();
if (record) {
console.log(record.age);
record.age = 66;
const _record = await T.save(record);
console.log(JSON.stringify(_record));
}
运行结果:

250px|700px|reset
- 使用 delete 删除记录
const T = kunlun.mongodb.table('my_test_table');
const record = await T.where({
name: '王一一'
}).findOne();
if (record) {
const result = await T.delete(record);
console.log(result);
}
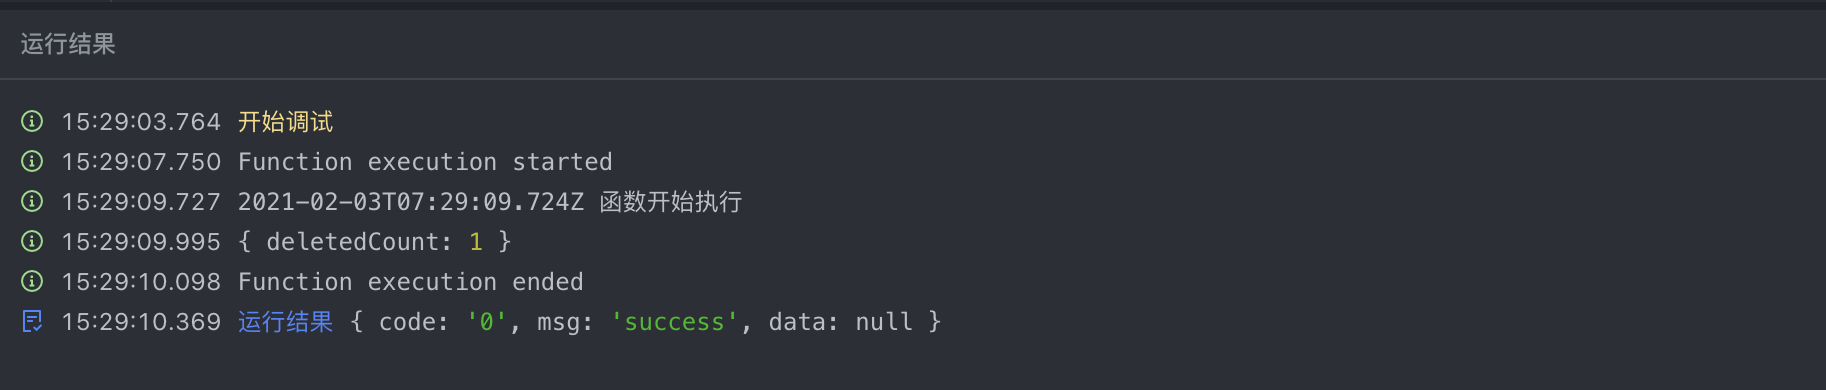
250px|700px|reset
完整 API 列表
Table
- 通过 const table = kunlun.mongodb.table('tableName') 获取 tableName 对应的 table 实例。
- 若该表不存在也可以正常返回,在后续对该表进行操作时,会首先尝试创建该表。
- 创建表时,要遵循创建表的限制:
- 表名需要由「数字」、「字母」、「下划线」组成且不能以「下划线」开头。
- 每个服务表数上限为 100 个。
- 接口列表
- table.create(obj)
- obj用于创建的原始对象,若传入数组,将会创建多个并返回数组
- return 生成一条数据库对象,并为之生成 _id 字段,返回该对象,注意此操作并不入库,若要入库,需要随后调用 save ;若参数为数组,返回创建结果的数组。
- create 并不 clone 一个新对象,后续修改 record 会对传入的 obj 产生修改,如下代码,入库时 age=20
const T = kunlun.mongodb.table('my_test_table');
const record = T.create({age: 10});
record.age = 20;
const result = T.save(record);
console.log(result);

250px|700px|reset
- table.save(obj)
- obj :用于保存的数据库对象,若传入数组,将会执行批量操作
- return:若 obj 由 create 生成,则返回值与 obj 相同,否则返回 table.create(obj) 的结果。
注意:
- 批量操作过程中若产生错误,不会对整个批量操作进行回滚,也就是说,正常记录将会进行正常操作,异常记录不会有任何操作,需要通过捕获的异常定位到发生异常的记录。
- save 一个数据库存在的对象,那么执行 更新 操作
const T = kunlun.mongodb.table('my_test_table');
const record = await T.where({ age: 20 }).findOne();
if (record) {
record.age += 1;
await T.save(record);
}
- table.delete(obj)
- 执行将对象从数据库中删除的操作,支持传入对象数组,此时执行将对象数组的所有对象从数据库中删除的操作
- table.where(arg)
- 为 table 生成一个 Query 对象,并链式调用其 where 方法,返回该 Query 对象。
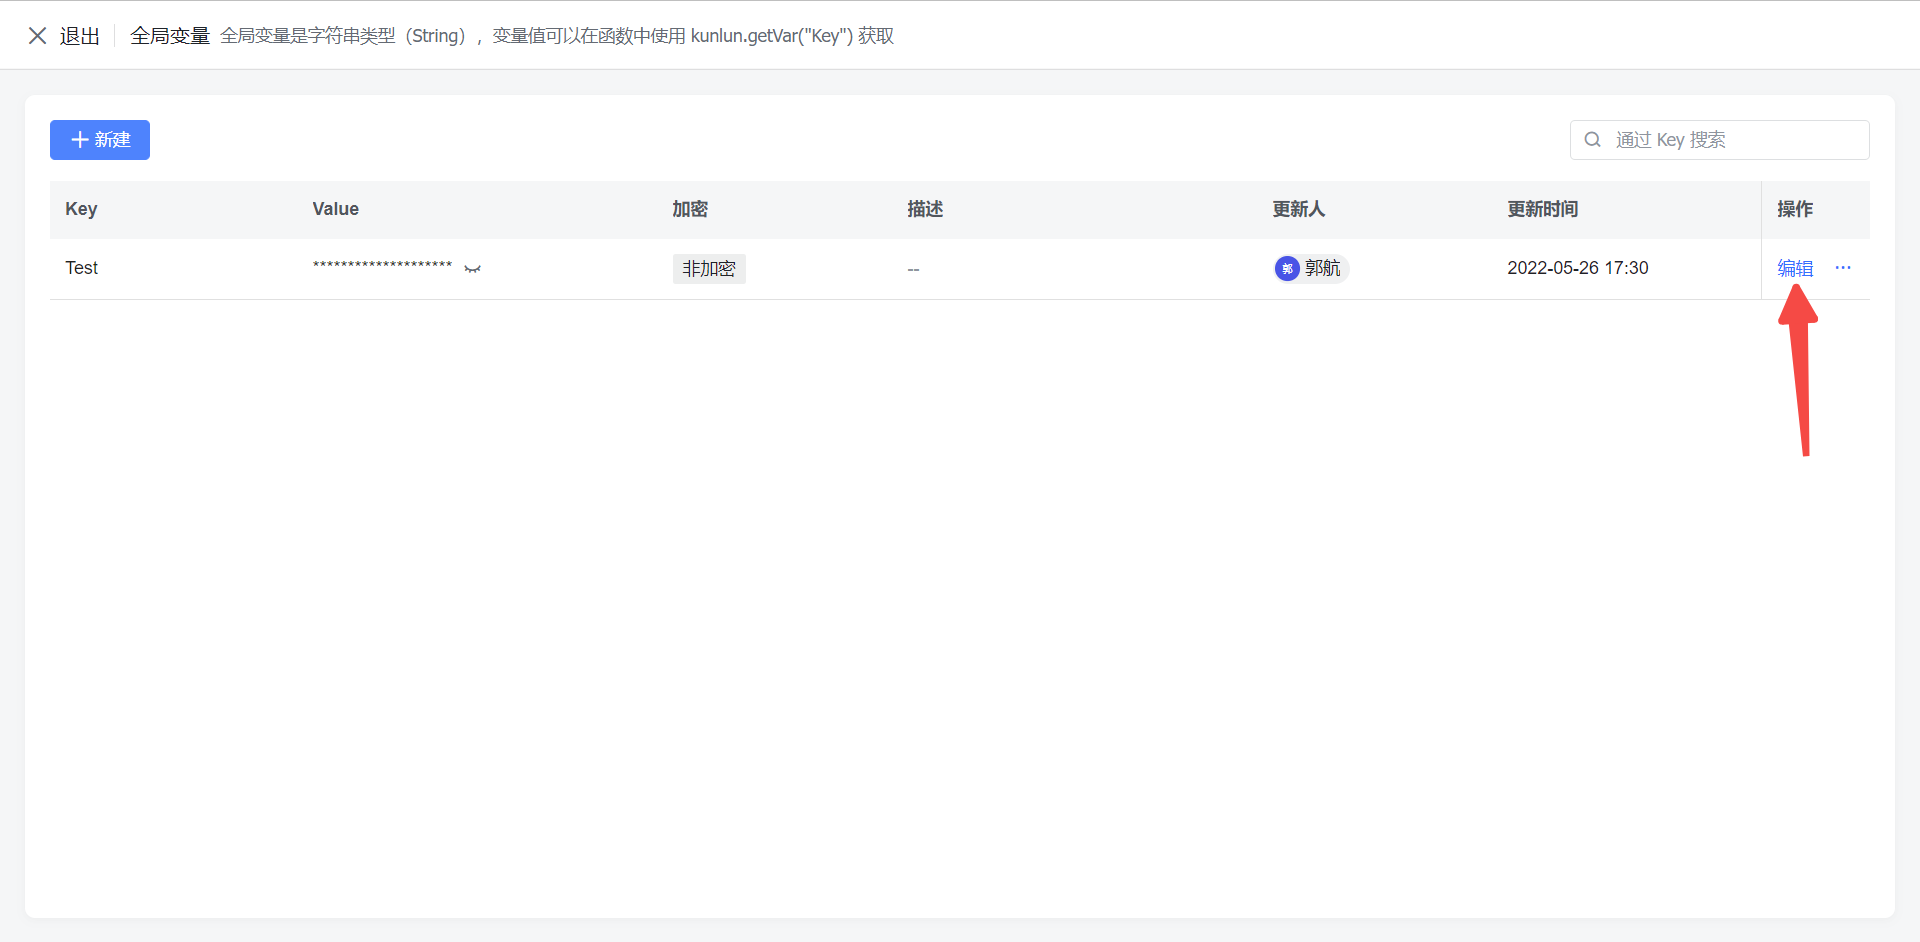
kunlun.getVar 消费全局变量
全局变量的值是字符串类型(String),变量值可以在函数中使用 kunlun.getVar("key") 获取
- 在函数中消费全局变量
const _var = await kunlun.getVar("key")
- 创建、修改、删除全局变量
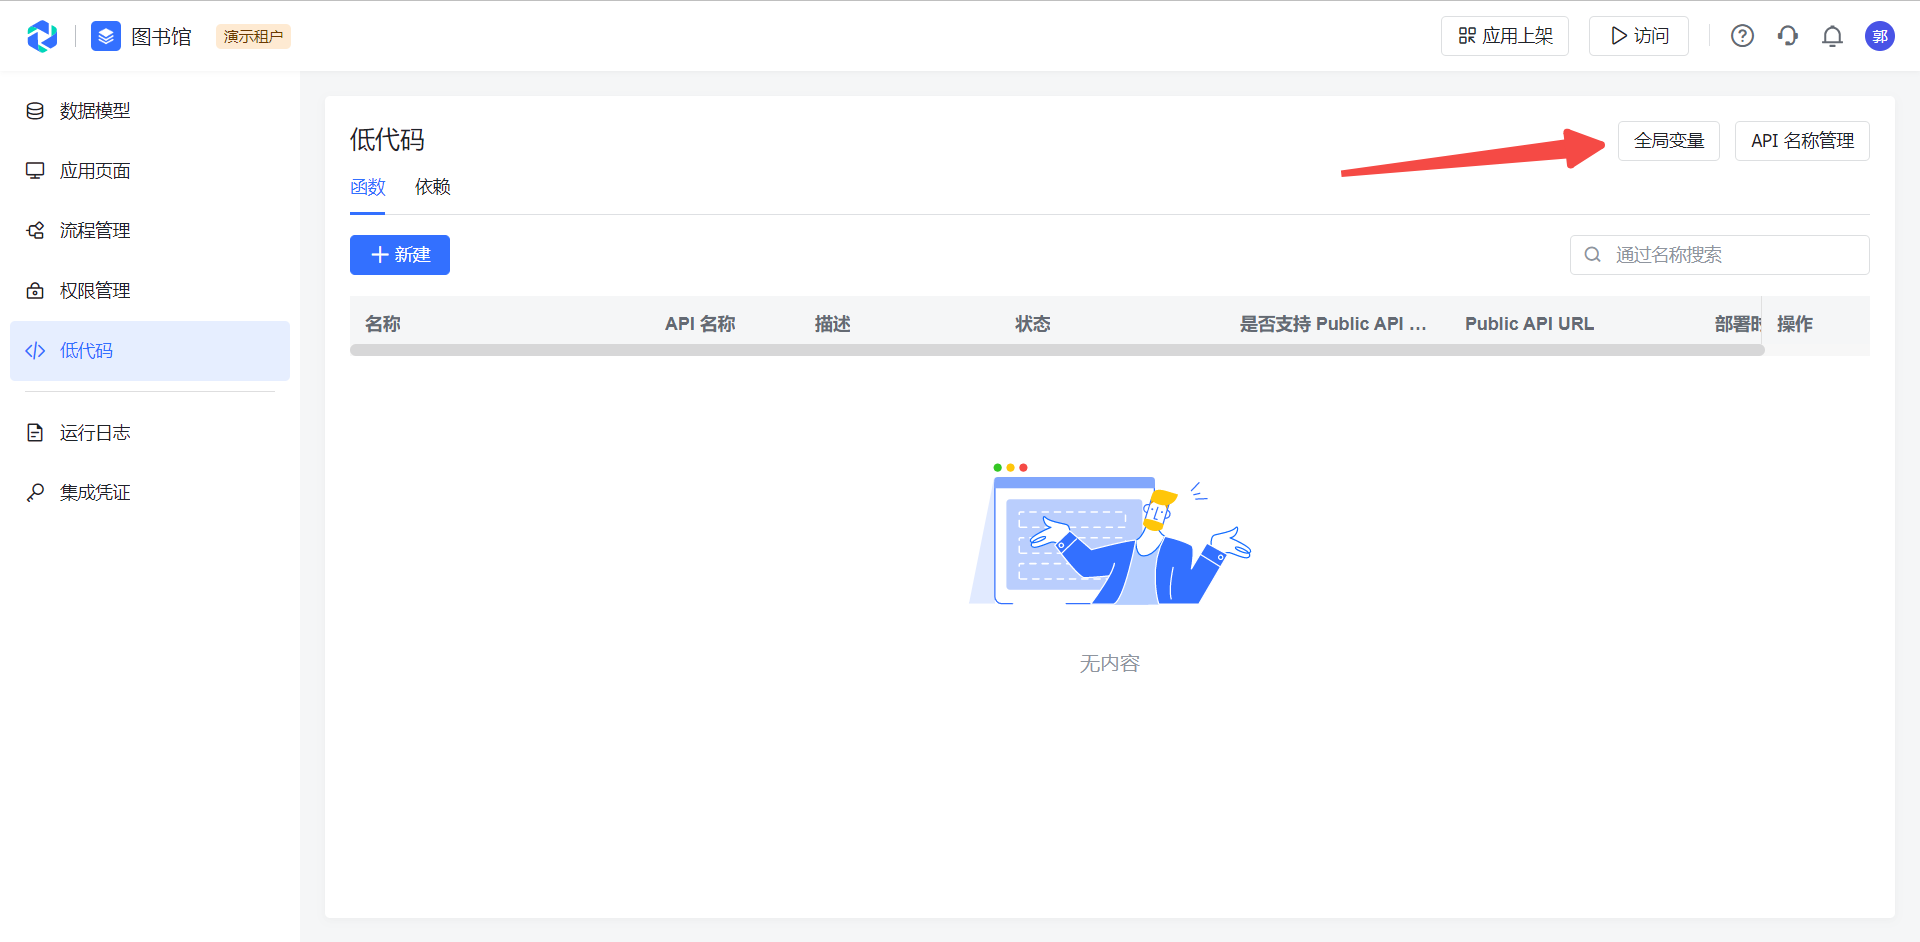
250px|700px|reset
250px|700px|reset
kunlun.tool 工具方法
.retry() 重试方法
需注意幂等问题,该方法不保证幂等
- 语法
kunlun.tool.retry(promiseFunc, {retryCount, retryDelay})
promiseFunc: 重试执行的函数,为没有入参的异步函数
retryCount:重试次数,最大可设置值为 10,默认值为 3
retryDelay:重试延时,单位毫秒(ms),默认为 0ms
- 示例
let employee = await kunlun.tool.retry(async() => {
return await context.db.object('employee').findOne();
},{
retryCount: 3,
retryDelay: 500
});
.http() 发送 http 请求
- 语法
kunlun.tool.http({ url, method?, headers?, query?, body?, responseType?, encoding?, timeout? })
参数
url: 请求地址
method: 请求方法,默认为 GET(不区分大小写)
headers: 请求头,content-type 随 body 动态解析
query: 请求参数
body: 请求体
responseType: 响应体类型,默认为 text,支持 text,json,buffer(尚不支持 stream)
encoding: 响应编码格式,默认 utf-8
timeout: 请求超时配置
返回值
statusCode: 响应状态码
headers: 响应头
body: 响应体
- 示例
let allRes = await kunlun.tool.http({
url: "https://zhouzilong.kunlun-staging.bytedance.net/public/package1__c/api",
method: "post",
headers: {
"content-Type": "application/json",
},
// queryString: {"c":"d"}, // GET 请求参数
body: JSON.stringify({"hello": "world"}),
responseType: "json",
encoding: "utf-8",
timeout: 1000
});
console.log(allRes.statusCode) // 响应状态码
console.log(allRes.headers) // 响应头
console.log(allRes.body) // 响应体
【其他】
发起 rpc 调用(仅限字节)
操作文件
- 可通过引入 fs 实现文件读写, const fs = require('fs');
- 文件系统约束:
- 可访问的文件系统路径为 /tmp/
- 文件系统的资源容量 512 MB,大文件请使用 对象存储服务(TOS)
验证错误
- 可通过如下方式在代码中返回验证错误给前端用户:
return new ValidationError(new kunlun.type.Multilingual({
zh: '中文文案',
en: 'english'
}))
- 前端会展示为 toast 报错:
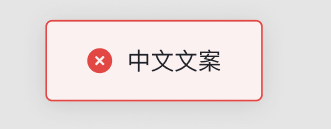
250px|700px|reset
- 返回验证错误后,将终止工作流的继续执行
附录 不同字段的数据结构说明
简单类型
复杂类型
最后更新于
2022/06/14