I. Intro
Who can perform these steps: Primary administrators or administrators with "Member and Department" permission.
As an administrator, you can bring members into the organization using one of two methods:
- Have members input their own information. Members can do this after an invitation has been shared with them.
- Input members' information yourself. Administrators can add members individually, or in a batch.
If you aren't an administrator, but you've been authorized by the administrator to invite organization members, see Invite members to join an organization.
Note: If your organization is on multiple paid plans, you can only invite or add members from the Feishu Admin Console.
II. Steps
Invite members from the Feishu Admin Console
You can add members directly from the Feishu Admin Console individually or in batches, or just send invitations.
Manually add members
- Open the Feishu Admin Console, and click Organization > Member and Department > Add Members.
- 250px|700px|reset
- Fill in the basic information of the member as needed, such as name and department.
- 250px|700px|reset
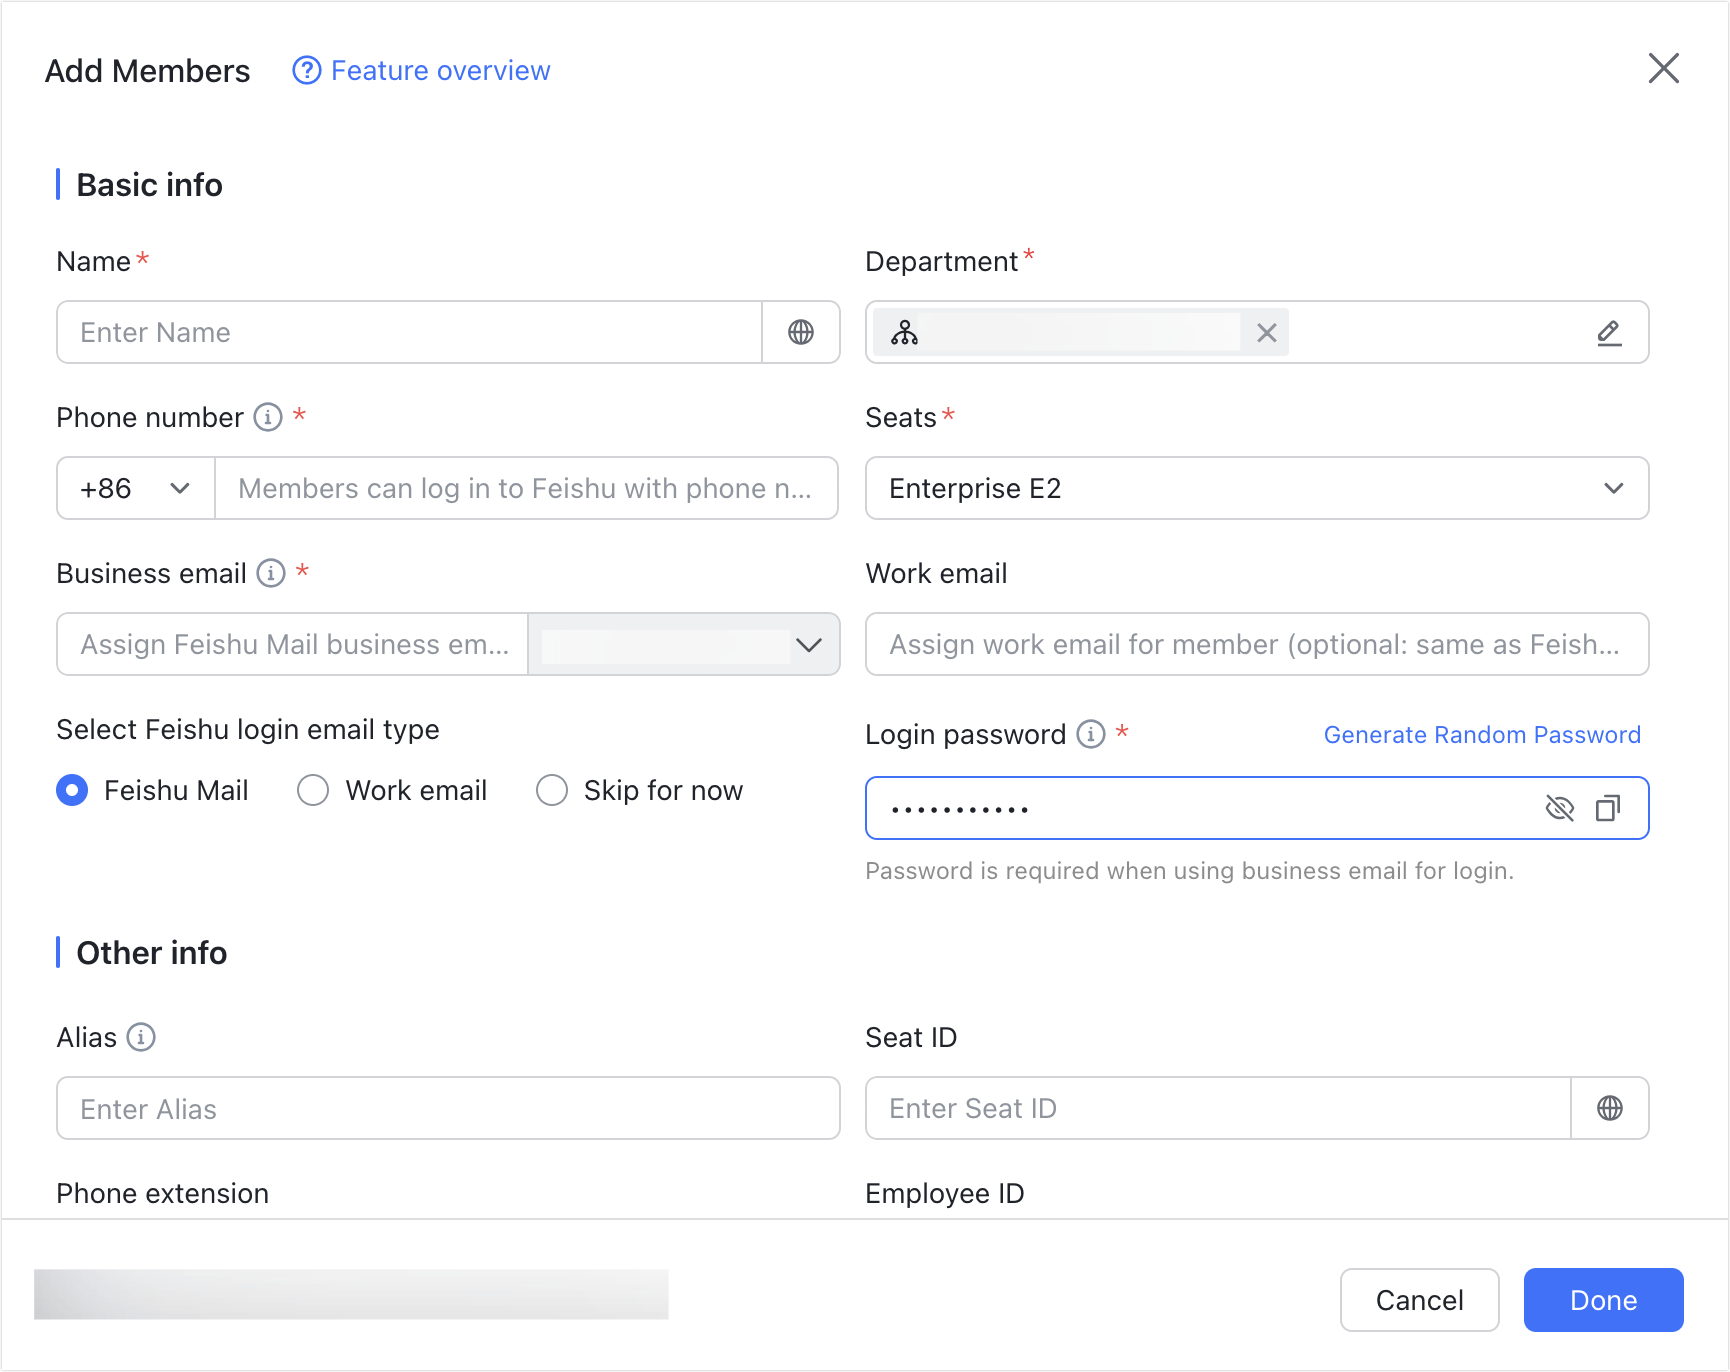
- (Optional) If your organization is on the paid plans, assign a seat to the member.
- If your organization is on a single paid plan, the plan under Seats is automatically chosen.
- If your organization is on multiple plans, you can either manually assign the seat now or assign the seats to a user group later, to which this member belongs. For more information, see Admin | Assign seats.
- Note: Seats that are not yet effective can also be assigned.
- Select the login email type for the member. When you select an email type, the corresponding field will become mandatory, and you must enter the email into that field.
- Note: If the member's phone number doesn't start with China's international dialing code (+86), whichever type you choose, you must fill in the "Work email" field.
- Feishu Mail: The member will use the assigned Feishu business email for login. You must also set the login password for the member manually or generate a random password, then send it to the member.
- Work email: Enter the email address that the member will use for work.
- Skip for now: If you select this, note the following.
- If the "Business email" field is empty and the "Work email" field is not, the login email will default to the work email.
- If neither email is provided, the member can log in through their mobile phone number. We recommend filling in both the work email and mobile phone number to ensure the member can receive invitation information.
- Click Done to send the invitations.
Invite members
- Open the Feishu Admin Console and click Organization > Member and Department > Invite Member.
- 250px|700px|reset
- Copy the invite code or organization link. Or download the invite QR code.
- Share it with members to invite them to join the organization.
- (Optional) At the bottom of the page, select when the invitation will expire and whether to require approvals from administrators for a member to join the organization.
- Note: It's mandatory for organizations on multiple plans to require administrator approvals upon invitation.
- 250px|700px|reset
- If you receive the approval requests of members joining the organization, you can approve their application through either the Feishu Admin Console or the Lark app.
- If your organization has bought seats, you must assign seats to the members to grant them access to the Feishu account under the organization.
- If you approve the joining requests in the Feishu Admin Console, you can choose the allocation method.
- If you approve the joining requests from a bot message, you won't be able to assign seats to the members directly. If the member is added to a user group that has been assigned seats, the member will automatically get a seat. Or you can manually assign seats to them.
- For more information, see Admin | Assign seats when adding members.
Add members in a batch
If you want to add multiple members, you can import them in batches.
- Open the Feishu Admin Console and click Organization > Member and Department > Members.
- Click the ⋮ icon > Bulk Import/Export.
- 250px|700px|reset
- Select Batch import new members and click Download blank template.
- Fill in the table as needed according to the instructions. Name, Contact phone number, Department, and Workforce Type are required.
- Note:
- You can only skip the login email type if the member's phone number starts with China's international dialing code (+86), otherwise, the import will fail.
- If you set "Business email" as the email login method, you must fill in the "Login password" field. Otherwise, the system will automatically generate a password. After the import is completed, Feishu will automatically download the password file.
- If the "Email login method" field is filled, you must also fill in the corresponding email field. If the "Email login method" field is empty but the "Work email" field is not, the login email will default to the work email.
- Save the file, select or drag it to the upload area, and click Import.
- 250px|700px|reset
- (Optional) If your organization has purchased seats, allocate seats for all newly imported members, then click Confirm.
- If your organization is on a single plan, assign a seat to the members in the pop-up.
- If your organization is on multiple plans, you can assign seats to either individual members or user groups. For more information, see Admin | Assign seats.
- (Optional) If the file included departments that do not yet exist in the organization, you can choose whether to automatically create departments and corresponding department groups, as well as automatically add the type of members to the department group. Click Auto Create Dept. or Ignore as needed.
- 250px|700px|reset
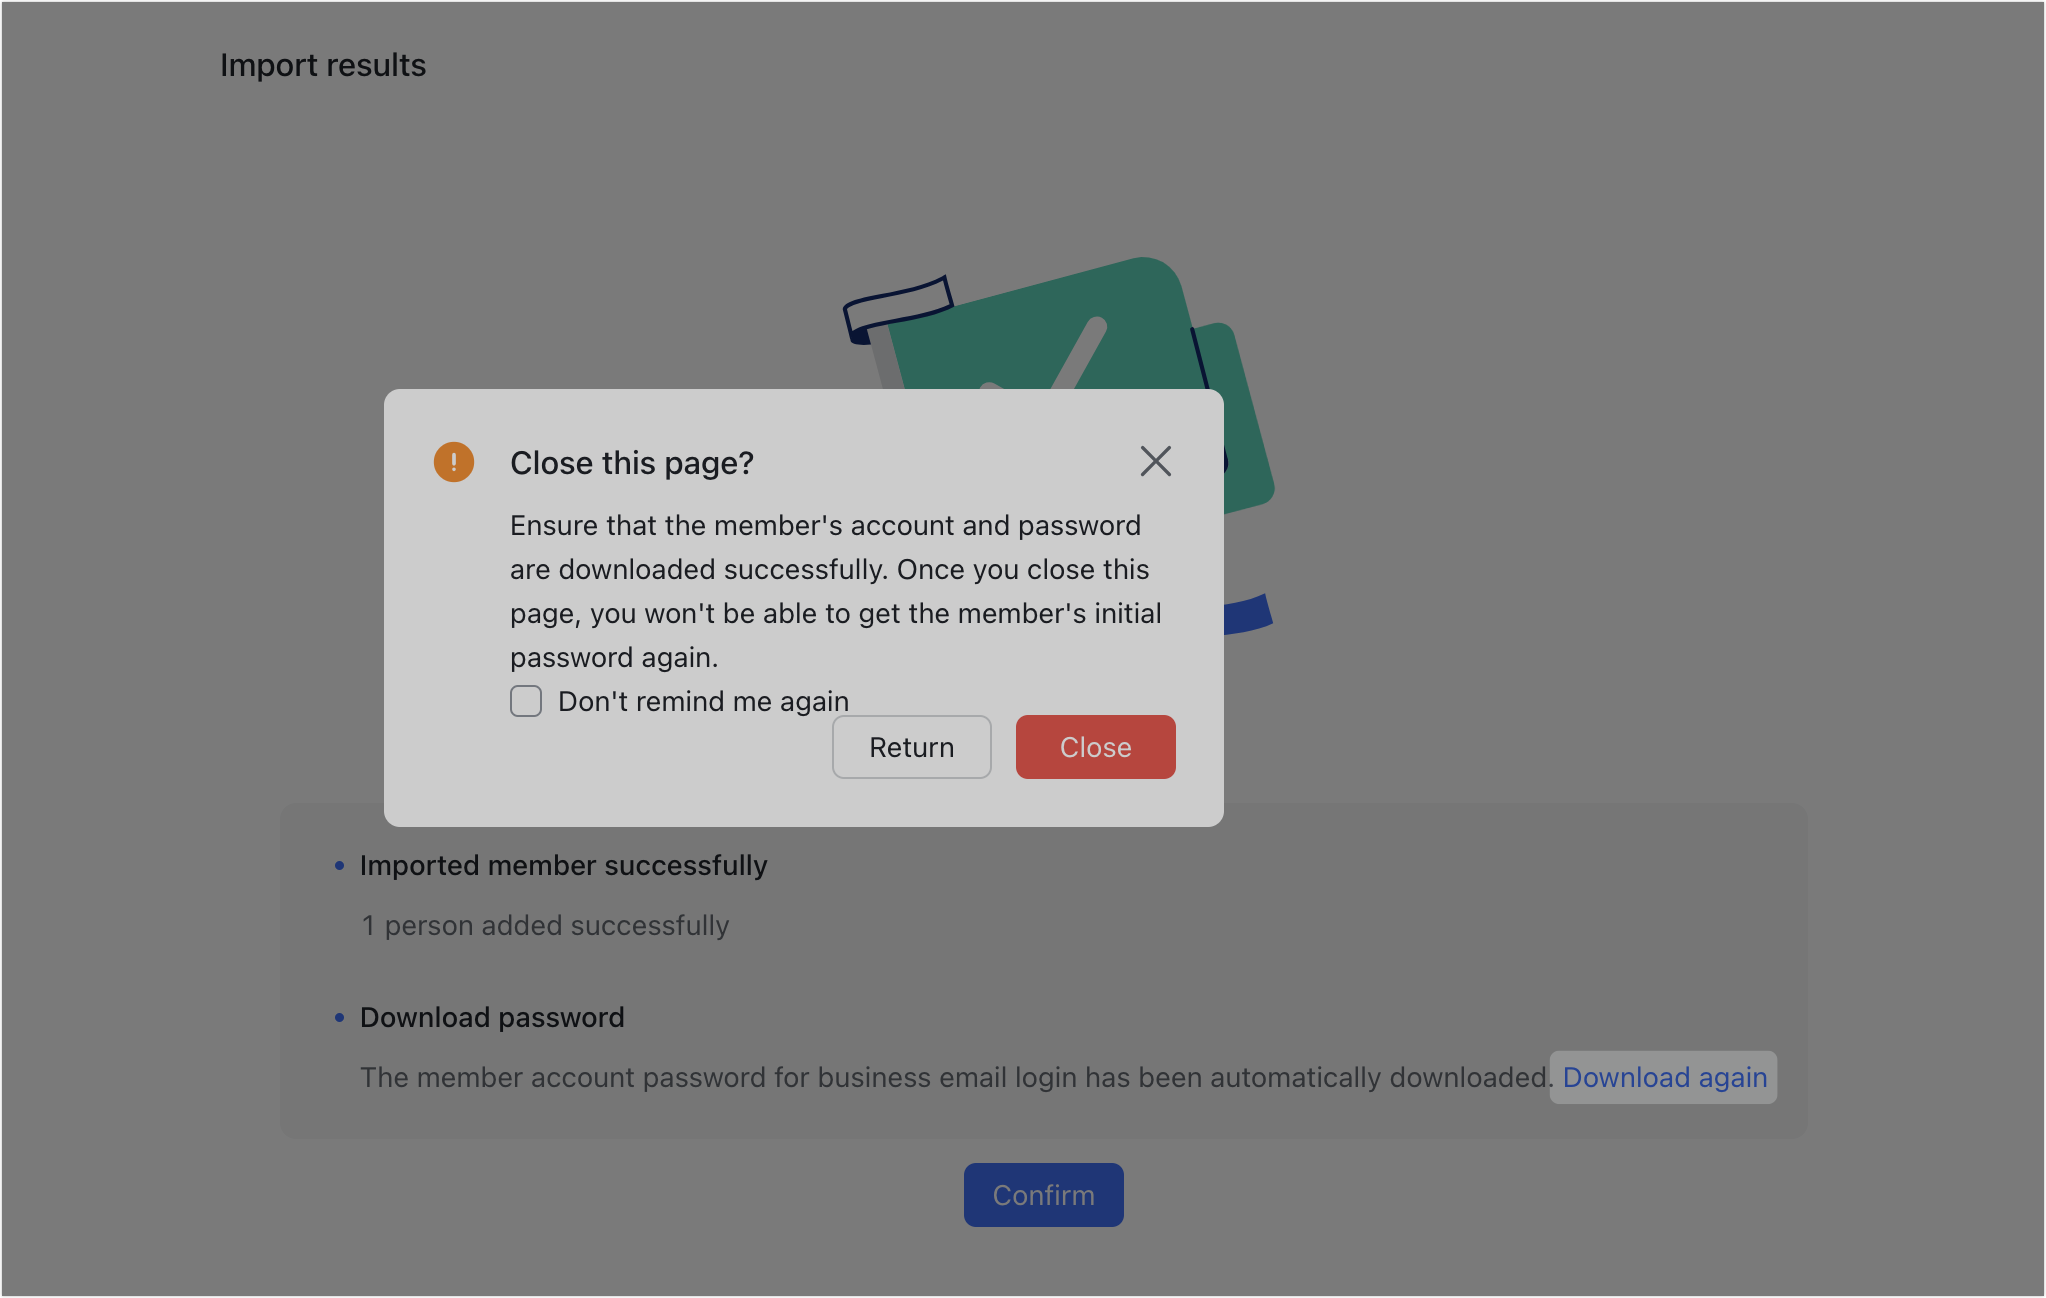
Feishu will automatically download the member accounts and passwords for those who will log in with the business email. If needed, you can click Download again. But once you click Confirm and then Close in the pop-up, you will lose access to this page and can't download again.
Important: After you close the page, you can't obtain the initial passwords of members again. Make sure that the login emails and passwords of members have been successfully downloaded to your local drive and send the information to the corresponding members to facilitate their login.
250px|700px|reset
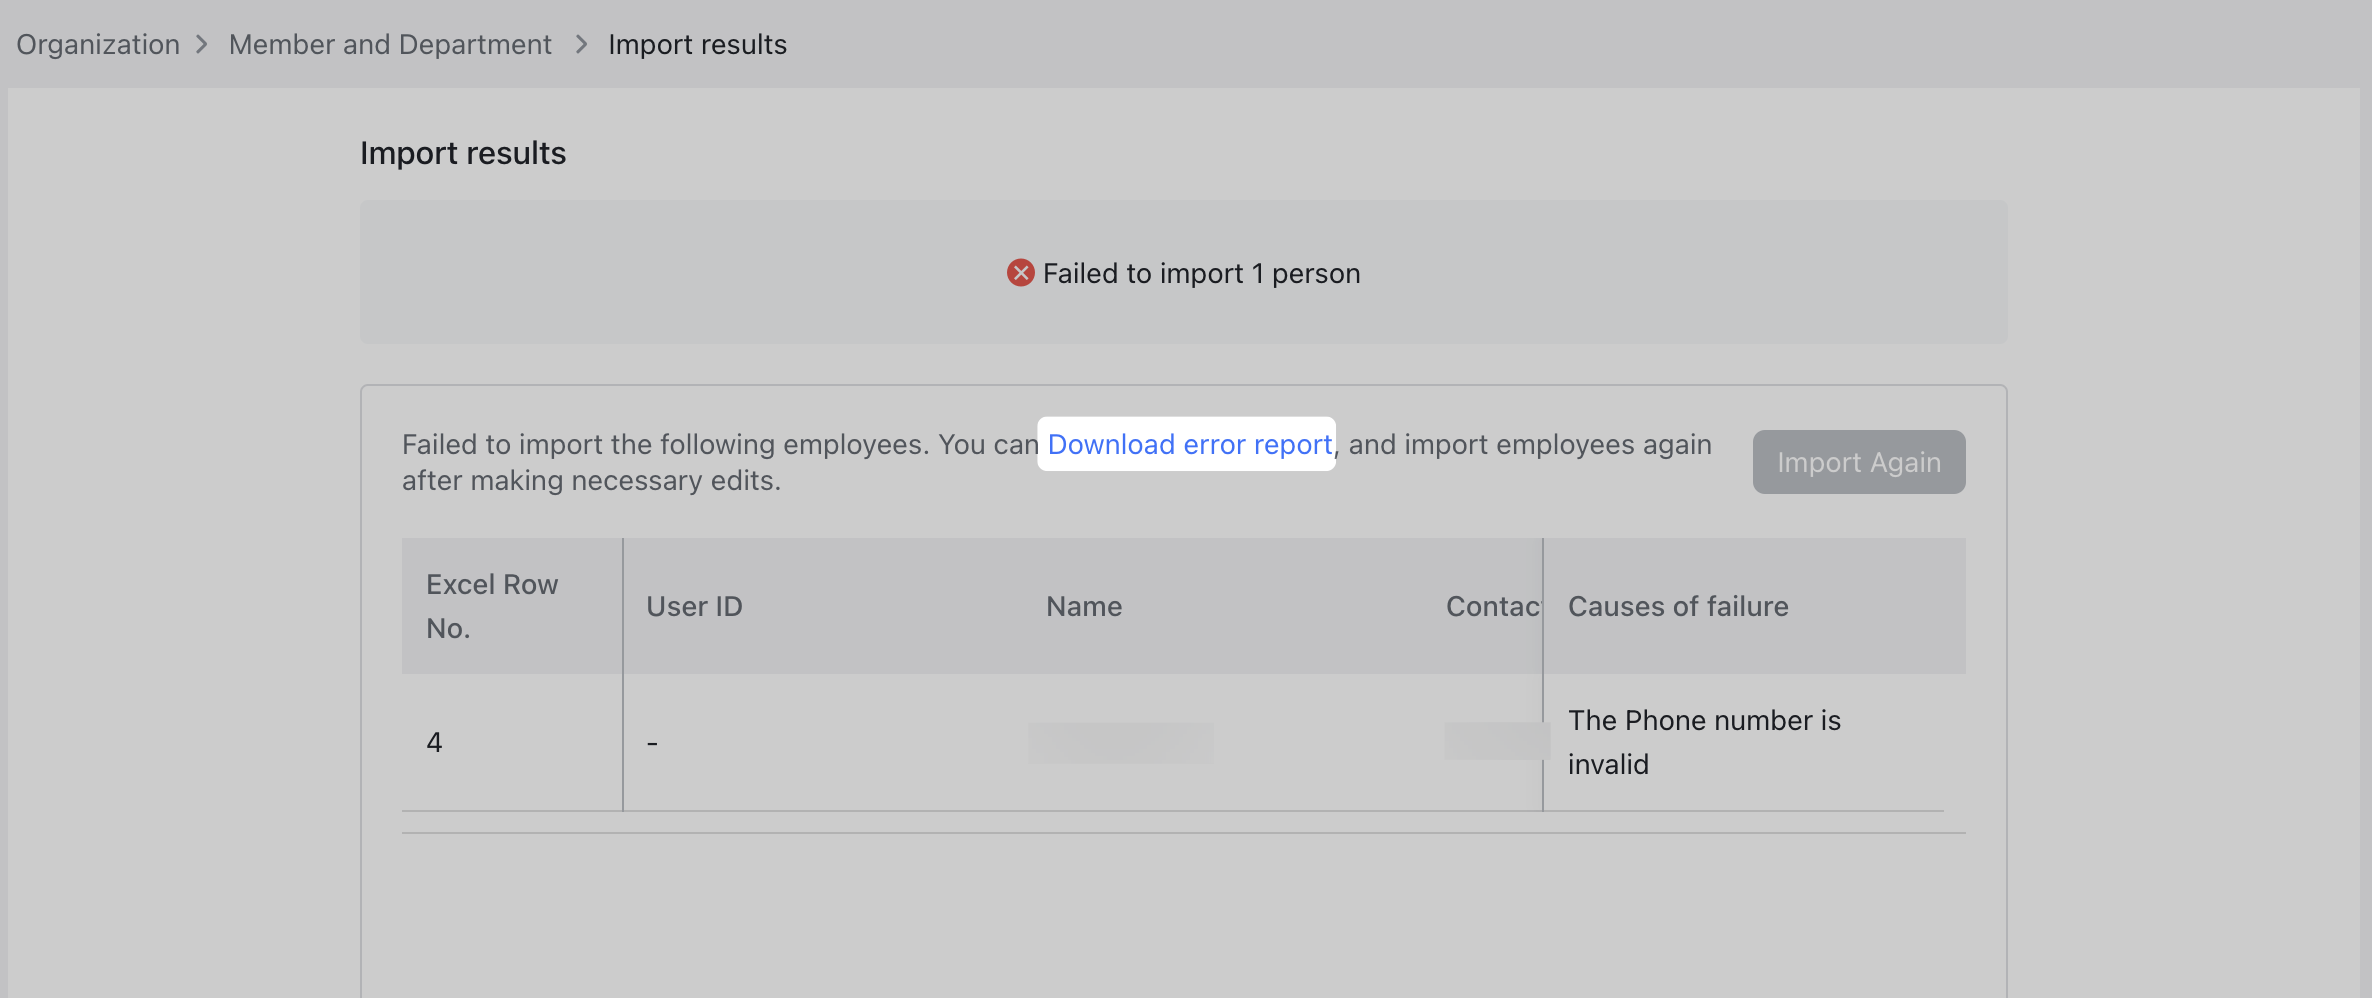
Note: If import fails, you will see a list of members who failed to get imported and why. Click Download error report and import members again after making necessary edits.
250px|700px|reset
Add members from the Feishu desktop app
If your organization is on two or more plans for flexibility, you can only invite members from the Feishu Admin Console.
- Open the Feishu desktop app, click the ⊕ icon, and select Add Organization Member. Alternatively, click Contacts > Organization > Add Organization Member.
- 250px|700px|reset
- Select the way you want to invite members:
- Invite QR Code, Invite Link, or Invite Code: Copy the generated QR code, link, or invitation code, and send it to the members to invite them to join the organization.
- Phone: Enter the member's phone number and name, and click Send to send a text message to the member. It is recommended to use the phone number to invite one or more members.
- 250px|700px|reset
III. FAQs